Sometimes we forget about fashion when it comes to DIY. If you never thought you can DIY fashion, these 7 DIY fashion ideas will definitely change your mind. These steps will help you do it from start to finish, struggle free. These DIYs are summery, fun and easy. So enjoy the process and get crafty.
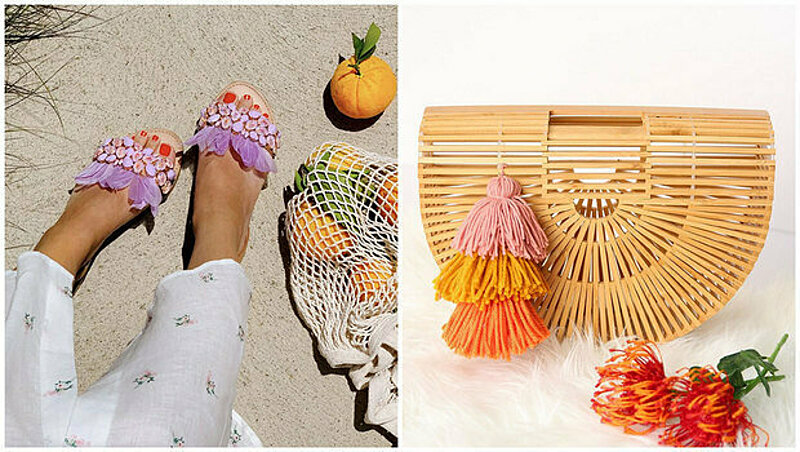
1. DIY Jeweled Feather Sandals

DIY & Image Credits: Honestly WTF
You will need:
- Stone crystals of your choice
- Matching gold settings
- Feathers
- Scissors
- Flat nose pliers
- Strong crafting adhesive
Steps:
1. Put the crystals in their matching settings and use the nose pliers to secure them in place.

2. Split the crystals into 2 equal sets, 1 for the first sandal and the other for the second one. If you got different sized crystals, organize those as well so you can mimic the pattern in the second one accurately.
3. Put a small dot of glue on the back of the crystal.

4. Glue on the crystal in the center of the sandal strap and start working your way outwards. Place them in different directions.

5. Place tissues or a small towel in the sandal to mimic your foot so it stays in place and with the right shape.

5. Once you reach the top edge of the sandals, stop and don't go down to the sides because they will slide off.
6. Cut and shorten the feathers before you start any of the steps so they can be ready to place them right away.

7. Select the feathers that face upwards and dip the quill in the glue.

8. Start adding them as soon as possible so they can stick to the glue from the crystals. If the crystal glue has dried a bit, slightly lift the crystal and press the feather between the crystal and strap.

9. Leave it to dry overnight.

10. Place the sandals on the sides and start adding the crystals there. Then dry overnight and do the other side.

2. DIY Track Pants

DIY & Image Credits: Sofia Clara
You will need:
- 4 cm ribbed orange ribbon
- 1.5 cm cream ribbon
- Floral pants
- Iron-On Adhesive or hemming web
- Scissors
- Iron
- Needle
- Thread
Watch the video to follow the steps:
3. DIY Statement Geometric Leather Earrings

DIY & Image Credits: Oh Happy Day
You will need:
- Leather
- Scissors
- Nose pliers
- Wire cutters
- Earring hooks
- Eye pins
- 1/16 inch hole punch
- Paint (colors of your choice)
- Small paint brush

Steps:
1. Cut 2 circles of leather.
2. Paint one side and leave it to dry, then paint the other side.
3. Punch a hole at the top and bottom of the circle.
4. Cut a rectangle from the leather and paint it as well.
5. Punch a hole at the top of the rectangle.
6. With the nose pilers remove the straight end of the eye pin. This should leave you with only a circle.
7. Open that circle slightly with the nose pilers so you can fit it into one of the holes that were punched in the leather circle.
8. Now attach the leather rectangle to the eye pin as well. Once your leather circle and rectangle are attached, close the opening of the eye pin it and secure well.
8. Attach the earring hooks to the top of the leather circles.
4. DIY Glitter Tote Bag

DIY & Image Credits: Damask Love
Watch the video to know what you need & the steps to follow:
5. DIY Tassel Jeans

DIY & Image Credits: Studio DIY
You will need:
- Jeans
- Pre-made tassels
- Sewing needle
- Clear nail polish
Steps:
1. Put the top of your tassel through the needle.

2. Fold the bottom of your jeans and make a small stitch at the hem. Make sure you don't go through to the front of the jeans.

3. Pull the needle until the tassel touches the hem of the jeans.

4. Make a tiny stitch or 2, remove the needle then tie the ends to secure it.

5. Brush a small dot of clear nail polish over the knot.

6. When it dries, trim the extra thread.
7. Repeat these steps until you have the number of tassels you want.
6. DIY Pearl Hair Clip

DIY & Image Credits: A Beautiful Mess
You will need:
- Plain hair clips
- Super glue
- Different sized pearls

Steps:
1. Separate the small pearls from the larger ones.
2. At the head of the clip start gluing the the larger pearls In a systematic, organized pattern.

3. As you move downwards to the tail start adding the smaller pearls.
4. Make sure you try to hide the openings in the pearl beads.
5. Leave it to dry and then start making more! Pearl hair clips look great paired together.
7. DIY Tassels for Summer Bamboo Handbag

DIY & Image Credits: Bliss Makes
You will need:
- Piece of cardboard (double the size of the tassel you want)
- 3 different colors of yarn
- Hot glue gun
- Glue stick
- Scissors
Steps:
1. Wrap the rose yarn around the cardboard 100 times.

2. Cut a 6 inch piece of yarn to tie around the middle of the wrap. Tie it twice to secure it.

3. Remove the yarn wrap from the cardboard by sliding it outwards.
4. Hold the the 6 inch tie, you just made, upwards and away from the wrap. Now cut the wrap in the middle to release the tassel.

5. Cut out another 6 inch piece of yarn. Lay it out and place the tassel on it. Tie it tightly around the tassel and make a double knot.

6. Trim off the excess yarn to make it even.

7. Repeat all these steps for the orange and yellow pieces of yarn. However, in step #4, just let the 6 inch tie to fall with the rest of the yarn, you don't have to hold it upwards and away from it.

8. Flip the rose tassel upside down and glue the head of the yellow tassel to it, using hot glue.
9. Leave it to dry for a bit and then flip the rose tassel and the yellow one together so you can glue the orange tassel to the inside of the yellow one.
9. Wrap the yarn around the bamboo and tie it well.